How To Activate Gmail for Google Workspace
Are you ready to activate Gmail for your Google Workspace account? To do this, you’ll need to update your domain name’s MX (Mail Exchange) records so your email can be routed through Google’s servers. This guide will help you through each step to ensure a smooth activation process.
Before you start
Make sure you’ve already created a Google Workspace admin user and verified your domain name for Google Workspace.
Step 1: Find your DNS editor
First, check which name servers are currently connected to your domain. This tells you where you should add your MX records later.
Use the table below to identify the correct DNS editor for your domain.
| Current Name Servers | Where To Add Google MX Record |
| ns1.crazydomains.com and ns2.crazydomains.com or ns1.dnspackage.com and ns2.dnspackage.com |
Select Crazy Domains' Account Manager DNS settings in Step 3. |
| ns1.syrahost.com and ns2.syrahost.com | If your domain is connected to our Linux Hosting, select cPanel DNS editor in Step 3. If your domain is connected to our Windows Hosting, select Plesk DNS settings in Step 3. |
| External Name Servers (not ours) | Select External Name Servers in Step 3. |
Step 2: Get the Gmail activation code
Once you know where to update your DNS, it’s time to retrieve your Gmail activation code (MX record) from the Google Admin Console. Here’s how:
- Log in to your Google Admin console.
- From the left menu, go to Account > Domains > Manage Domains.
- On your Primary Domain row, click Activate Gmail.
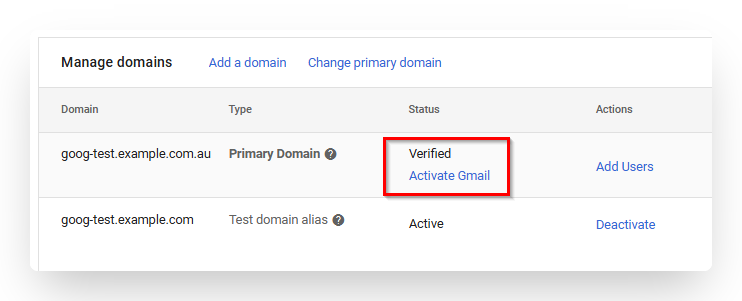
NOTE. If you see Verify domain instead of Activate Gmail, that means your domain hasn't been verified yet. You’ll need to verify your domain first before continuing.
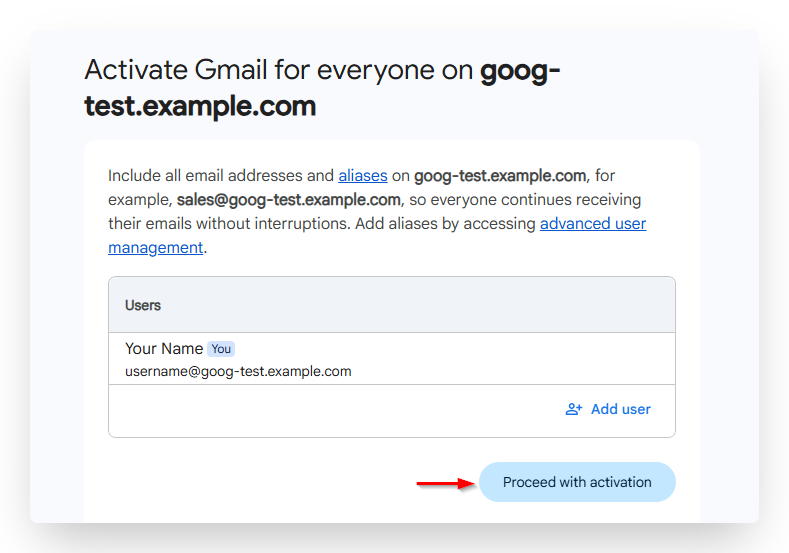
- In the pop-up, select Set up MX record, then click NEXT.
- Click Continue, then Proceed with activation.
- On the next page, ensure Crazy Domains is set as your domain host, then click Continue.
- On the Add Gmail activation code page, copy the MX record shown.
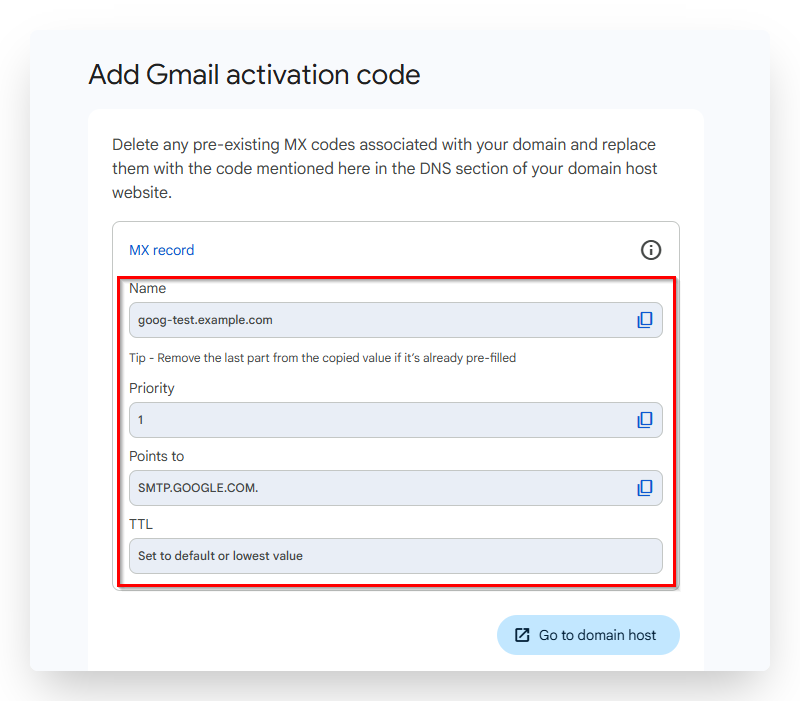
IMPORTANT. Keep this page open—you’ll return to it after adding the MX record to complete activation. If you accidentally close it, you can repeat these steps to get back.
Step 3: Add Google MX record to your DNS
Now that you have your MX record, it’s time to add it to your domain’s DNS settings. Use the same DNS editor you identified in Step 1.
Select one of the DNS zones below that corresponds to the name servers of your domain.
If your name servers point to ns1.crazydomains.com and ns2.crazydomains.com; or ns1.dnspackage.com and ns2.dnspackage.com, follow these steps:
- Log in to your Account Manager. to your Account Manager and access the DNS settings for your domain name.
IMPORTANT. Delete any existing MX records associated with your domain before adding the new ones from Google.
- Click ADD RECORD and select MX Record.
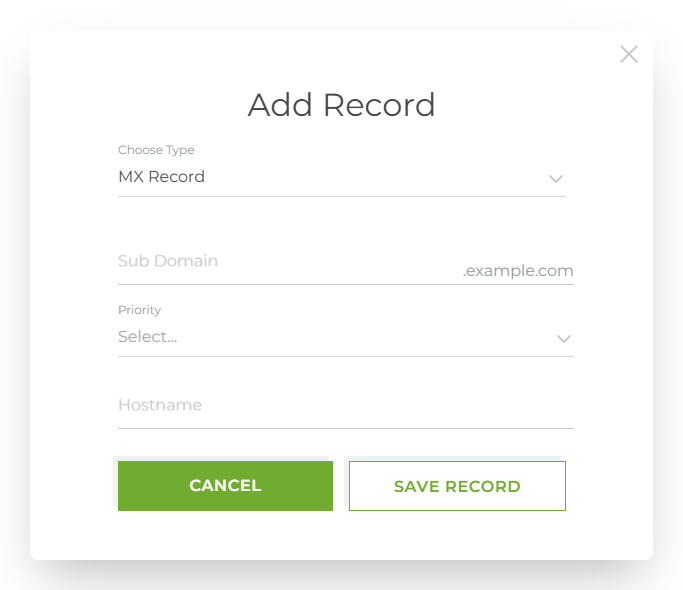
- Enter the following details provided by Google:
- Subdomain: Enter only the MX name only. For example, if it’s goog-test.example.com, just enter goog-test. Your domain will be added automatically.
- Priority: Set this to 1.
- Hostname: SMTP.GOOGLE.COM (without the last dot)
- Click SAVE RECORD and wait for the new record to fully work or resolve.
Add your Google MX record in cPanel DNS Editor if the current name servers of your domain name are ns1.syrahost.com and ns2.syrahost.com and your domain name is connected to our Linux Hosting product.
- Go to your cPanel DNS editor.
- Look at your current DNS records and remove any MX records that are not associated with Google.
- Add a new MX Record.
- On the Name field, enter your domain name.
- On the TTL field, enter 3600.
- Select MX in the Type field.
- On the Record fields, enter 1 as Priority and ASPMX.L.GOOGLE.COM as Destination.
- Click Save Record and wait for it to fully work or resolve.
- Follow the same steps to add the remaining Google MX records below:
Name TTL Type Priority Destination (your domain) 3600 MX 5 ALT1.ASPMX.L.GOOGLE.COM (your domain) 3600 MX 5 ALT2.ASPMX.L.GOOGLE.COM (your domain) 3600 MX 10 ALT3.ASPMX.L.GOOGLE.COM (your domain) 3600 MX 10 ALT4.ASPMX.L.GOOGLE.COM
Add your Google MX Record in Plesk DNS Settings if the current name servers of your domain name are ns1.syrahost.com and ns2.syrahost.com and your domain name is connected to our Windows Hosting product.
- Go to your Plesk DNS Settings.
- Look at your current DNS records and remove any MX records that are not associated with Google.
- Add a new MX record.
- Select MX in the Record type option.
- Leave the Mail domain textbox empty or blank.
- Enter 3600 in the TTL field.
- On the Mail exchange server field, enter ASPMX.L.GOOGLE.COM.
- Set the Priority to 1
- Click OK and wait for it to fully work or resolve.
- Follow the same steps to add the remaining Google MX records below:
Record Type Mail Domain TTL Mail Exchange Server Priority MX (leave this blank) 3600 ALT1.ASPMX.L.GOOGLE.COM 5 MX (leave this blank) 3600 ALT2.ASPMX.L.GOOGLE.COM 5 MX (leave this blank) 3600 ALT3.ASPMX.L.GOOGLE.COM 10 MX (leave this blank) 3600 ALT4.ASPMX.L.GOOGLE.COM 10
If your domain name is connected to external name servers (not ours), contact the name server provider, or find the appropriate guide here: https://support.google.com/a/topic/1611273.
Step 4: Complete Gmail activation in your Google admin console
Now, let Google know that you’ve added the MX record in your DNS editor. Follow these steps:
- Go back to the activation page you left open earlier in your Admin Console.
- Tick the Come back here box and click Confirm.

TIP. If you've closed the page, just repeat Step 2 to reopen it.
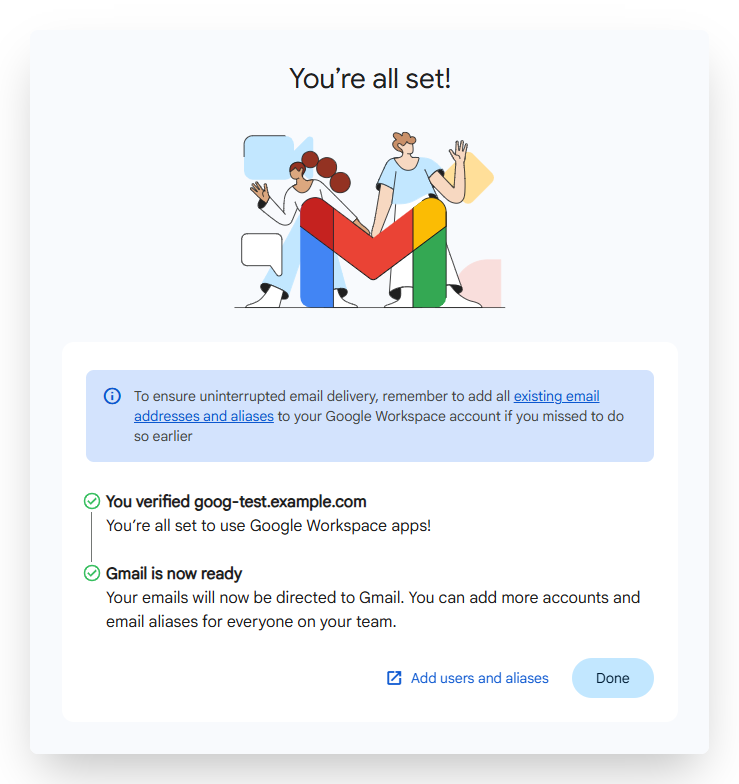
- Wait while Google verifies the new DNS settings. Once verified, you’ll see a confirmation page. Click Done.
NOTE. If you get an error, it likely means the DNS changes haven’t fully propagated. Wait for the new DNS records to fully work or resolve before you try again.
That’s it! Gmail is now activated. You can now send and receive emails and enjoy all the benefits of Google Workspace apps.